Monday, November 30, 2009

Christmas Tree & Decorations

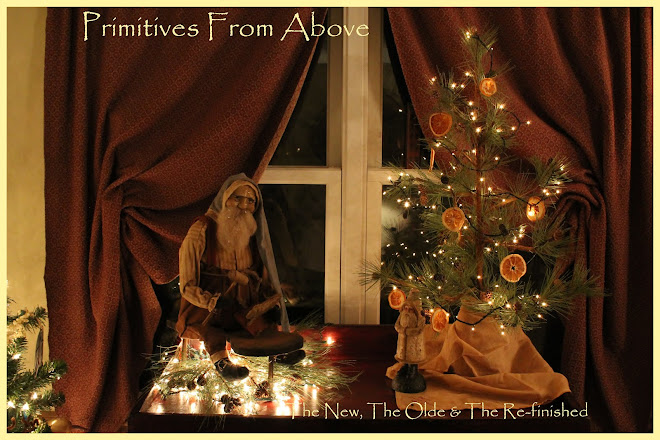
After a much needed break from helping my parents…..my tree is up and my decorations are out.  I didn’t put out all of my trees this year because I was just plain tired, but for the most part it is all out.  I have one tree that I normally put out with cinnamon sticks and orange slices with rice lights, but I couldn’t find that tree.  Hmmm, maybe I will find it before next year rolls around (lol).  Anyway, here are some pictures of my tree in the family room.  I snapped the pictures before I was able to hide the cords so excuse the mess.  I also attached a few other pictures of the decorations around my home and a few close up pictures of my Christmas tree ornaments.  I love this time of year!!

017

024 027 025

026 042

019

Here are some decorations that I have around my home.  This Santa is in my entry way…. you might have seen him as my blog header as well.

001

028 029

I had my little snow girl in front of my checkerboard, but then I made a snow girl made out of a gourd and decided that she would look better up there.  Isn’t my snow girl gourd cute?  Gosh, isn’t that a mouth full?!?

046

Here are some close up pictures of my gourd .  I thought she turned out real cute!

039 038

Are you anxious to see more?  Well, let’s take a look – ok?

034 031

048 050 051 052

053 054

055 056

057

Hope you enjoyed all of my Christmas decorations.  I have them scattered here and there throughout my home so there is a little Christmas cheer in every part of my home.  I also had to show you a new beauty that I purchased before my Mom left her old house.  I had my eye on this bowl rack for some time and well…. I finally bought it.  I just need to load it with bowls now.  If any of you gals out there see any bowls or are selling any in your shop please let me know.  I need a couple wood bowls to fill my rack up.  Of course they would need to be a rather good size to look right.  Here is the black beauty!!  Isn’t it pretty?  I am not sure if you can see it, but there is some red in it as well.  Very pretty!!

030

Well, I better run for tonight.  Hope you all are recovering nicely after eating all of that turkey, stuffing and pumpkin pie.  I know that I am doing just fine, but could probably go for another piece of pumpkin pie right now (lol).  Mmmm, with lots of Cool Whip!!

Blessings, Lisa

Saturday, November 28, 2009

Refinished Cabinets ~ Before & After

Did you all have a nice Thanksgiving?

WOW – I must say that I enjoy having my parents close by, but helping them over the past couple weeks has been crazy!!  I re-finished their kitchen cabinets per my Mom’s request and that is what I have been doing since last Friday…..not yesterday, but last Friday.  They finally got moved in the day before Thanksgiving and we have been busy unpacking and trying our best to get them settled.  I thought I had lots of stuff that I didn’t want to get rid of, but man you should see all of the stuff from my parents home.  Yep, my Dad doesn’t ever want to get rid of anything and as much as my Mom would like to just pitch alot of the stuff…..well, Dad tends to get his way (lol). 

My Mom found out rather quickly that this house is smaller then their condo that they were living in, but she is making do.  Alot of her great knick knacks are in the basement right now and I am not sure that she will have the room for all of them.  I can so see her selling some of it, but hopefully she will let me go through some of it first (lol).  Hopefully she will get more organized soon because I need the rest.  I am so behind on my orders, my swaps and soooo late in getting my Christmas decorations out.  Yep, I don’t even have my tree up yet, but hopefully tonight that will happen.  Pictures on that coming soon!!

So, are you ready to see before and after pictures of my Mom’s kitchen cabinets?  Well, let’s take a look shall we?  This is definitely a great transformation!!

BEFORE

103

104

AFTER

031

032

What do you think?  I was definitely pleased with the way that they turned out and I can’t believe how much of a face-lift it gave the kitchen.  Did you notice the paint on the walls?  They liked my Bleached Wheat paint so much that they used it in their kitchen, family room and master bedroom and bath.  It definitely helped give the rooms a boost compared to the plain white walls.

Here are some close-ups of some of Mom’s lights and her bathroom light which looks great against her red walls.

024 025

022

The electrician is due to come out on Tuesday to hang her Whaler light and that will be hung over her island in her kitchen.  It will look beautiful I am sure.  Of course I will share pictures of that soon.  Well, I better run for now.  I have to stain some wood knobs for my Mom’s cabinet doors and drawers and finish up a few orders to ship on Monday.  Hopefully if all goes well, I will have my trees and the rest of my decorations up tonight.  Enjoy your weekend everyone!!

Until Next Time….. Blessings, Lisa

Monday, November 23, 2009

To answer a few questions….

This post is to answer a couple questions that alot of you have regarding my previous post.  If you haven’t seen a little sneak peek of my Mom’s kitchen cabinets then be sure to look at the previous post!  Ok, let’s answer some of your questions……

1)  What kind of paint did you use?  I am using Olde Century Paint – the color is Olde Brick Red and it is an acrylic latex paint.  It is pretty expensive for a gallon (normally around $50.00), but it is great for painting kitchen cabinets and cupboards that you might have around your home.  Wonderful paint to work with.  I used the same paint, but in buttermilk for my paint.  You can see pics of my re-finished kitchen in previous posts.  Just check out my archives.

2)  Did you sand your Mom’s kitchen cabinets before applying the paint?  Yes.  I used my hand sander and sanded the drawers, doors and the frames of the cabinets themselves.  I applied primer to the ends of the cabinets because the paint would not adhere to that pressed wood.  I was luckily able to just sand mine and not use primer, but Mom’s cabinets required the primer.

3)  Do you plan on using a stain as well?  Yes.  I will use a dark walnut Minwax stain after everything has received 2 coats of paint and has dried thoroughly.  I will apply the stain with a foam brush and then wipe it off with an old rag.  This will give it the antiqued look similar to what my cabinets look like just a bit different because Mom’s are red.  I will antique the corners a bit more to make them look a little bit more worn.  I do plan on adding some wood knobs and I will stain those the dark walnut as well, but wipe them after the stain has been applied.  This will help prevent them from being so dark.  We tend to like the lighter version of the dark walnut stain.  Her wood knobs will look just like mine on my kitchen cabinets.

Hope this answers some question for you all.  I am off to the house to do some more work.  Have a great one!!!

Sunday, November 22, 2009

Seeing Red and Lots of It

Where have you been Lisa?  I am sure that is what alot of you are wishing you could ask me right now.  Well, my parents closed on their new home on Friday (Thank God) and I have been busy trying to make my Mom’s dreams come true.  Yep, you heard me right, I have been re-finishing her kitchen cabinets and it has been keeping me VERY busy!!  Yesterday I pulled a 10 hour day and today I pulled an 11 hour day so I guess you could say that I have been busy and seeing lots of red.  So, do you all wanna see a little peek?  The cabinets are not done yet and the walls still need to be painted, but things are slowly getting finished.  We hit a few snags today with some other things, but I am confidant that they will get fixed.  Next time I post….. I will have some finished kitchen cabinets to show you.  So, enjoy looking at these and the light fixtures and I will hopefully post some more in about 3-4 days or maybe later.  If I don’t talk to you all before then…..I wish you all a Happy & Blessed Thanksgiving!!

003 004 005

007

Hope you enjoyed the little peek.  Just a little side not for my Mom ~ Keep your chin up, things will get done before you get moved in and things will be beautiful…… I promise.  I love you!!

Happy Thanksgiving Everyone!

Thursday, November 19, 2009

Rag Ball Ornaments

Well, I got out my totes full of Christmas decorations and put out a few things here and there, but that is as far as I got.  I hate it when I get distracted.  Anyway, I put up a few things on the wall, got some of my greenery out and got out a couple trees.  I got one of my trees out and thought that it needed something different this year.  I was thinking about what I could put on the tree in order to bring some life to it and I thought some little rag ball ornaments would be cute.  Well, I had some old glass ball ornaments that I don’t use anymore so I thought I would put them to good use.  I grabbed some red homespun and let my creativity go to work.  I was pretty pleased with the way that they turned out too.  Here is a brief tutorial…..

~~~~~~~~~~~~~~~~~~~~~~

I took my Elmer’s glue and watered it down just a little bit.  I used a q-tip to mix the glue up and apply it to the bulb.

109

I then took my homespun and tore it into small thin pieces and then cut a few to put in areas that might not get covered.  I made sure that my strips were frayed so it would look just like a rag ball.  I wanted something real prim for my tree.

110

I applied my glue and totally covered the glass bulb.

112

I started wrapping the homespun around the bulb and added extra glue when I needed it.

113

Completely wrap all areas of the bulb. When you are finished…totally and completely cover the bulb with the  glue mixture.  This will allow the bulb to dry and harden.  Once the rag ball decorations are dry, the cloth will be hard and that will prevent the homespun from moving or unraveling.

114

Here are a few that I made.  I hung them in a place where I knew they would dry quickly.  This prim gal is not patient (lol).

111

I then decided that I needed to do something to cover up those bright gold tops.  So, I applied more glue and sprinkled them with cinnamon.  Not only do they look great, but they smell wonderful too.  Here they are on my tree.  So, what do you think?  Really looks cute on my tree – huh?

121

I also coffee stained my tree skirt.  It wasn’t quite dark enough for me.  So, after a big distraction and a little break, I am off to do more decorating.  More pictures coming soon.

Until Next Time……..Lisa


Tuesday, November 17, 2009

Thrift Store Tuesday

Do you all remember this sled that I bought at my local thrift store months and months ago?

170 171

Well, I re-finished it this past weekend when it was beautiful and 60 out and well I am glad that I did it.  It has been not so warm out and well to be quite frank with all of you…..it has just been too cold.  I want that warmer weather back.  Anyway, I wanted to paint the sled a barn red so it would show up more when I hung it up on my front porch.  I was definitely pleased with the way it turned out.  Take a look.

101 102

I gave the one part of the sled another coat of flat black spray paint and then I used Barn Red on the top.  Once I was done, I sanded off a bit and then used my Dark Walnut Gel Stain on it.  I remembered after I used the gel stain why I like the other stain so much more.  Everyone is different.  I used what I had handy and well since I couldn’t find the liquid form…..well, I used the gel instead.  It still turned out nice.

Did I mention to you all that I took my Halloween/Fall/Thanksgiving decorations down already?  I took them down and packed them away for another year.  I went and looked through some of my totes, but have not put any Christmas stuff up yet.  I need to do it this week sometime because after Thanksgiving time is going to be hectic with helping my parents get settled in.  Yep, they are due to close this week on both ends and then next week they move.  This weekend is going to be busy working on Mom’s cupboards and well, I just simply won’t have the time to take care of my home and get my decorations up.  So, I guess I will attempt to do it this week sometime.  Here are some decorations that I came across……these will go on my big tree.  Aren’t they just so cute and prim?

182 183 184 185

I am also planning on putting a tree up in Cameron’s room.  He is so excited about it.  I thought he deserved his own “little tree” with his own decorations.  I have started collecting ornaments for him for every year since being born.  That way when he moves out then he has an ornament for every year.  A great idea – huh?  I thought it was a nice tradition.  Anyway……..we did put our outside decorations up this past weekend since the weather was so warm.  We are going to go with something more simple this year.  We normally have white lights everywhere, but I didn’t feel like putting them up so we just did a few here and a few there plus I will have my prim Santa out along with my manger scene that my FIL made for me one year.  It should look just as nice, but without all the hub bub.  I will leave you with just a taste of what my farm table “MIGHT” look like during the Christmas/Winter months.  After just experimenting a little bit….. I thought this looked beautiful, but I have much more to try as well.  Gotta love the beauty of trying things out on the table (lol).  Isn’t it pretty?  Gotta love my candlesticks that I re-finished.  They look beautiful with my battery operated prim candles.

141

Ok, I promise this is my last picture for the day.  My son is always wanting to put on Daddy’s shoes and wear one of Daddy’s ties so just yesterday, I dressed him up and drew a moustache and goatee on him with some glasses.  He absolutely loved it.  He said he looked just like Daddy.  Anyway, I sent the picture to my husband at work and he of course thought it was to cute.  Gotta love Halloween face crayons.  Thought I would share the picture of Daddy Junior with you.  Enjoy!

101 108

Until Next Time…….Lisa